Tabs

Monday, February 29, 2016

Happy Birthday Honey


Welcome to Monday my friends. It’s Masculine Monday over at SSINK today! The designers have some great masculine cards to show you today. They never cease to amaze me with their talents. 

Color Combination:


I started by selecting the Going Places DSP and from there selected the rest of the colors to combine it with. 


If you would like to make this card I have listed the measurements and products below:

Measurements:

Basic Gray card base 4 ¼” x 11” scored 5 ½”
Going Places DSP 4 ¼” x 2 ½”
Hello Honey 2 3/8” x 2 3/8”
Very Vanilla 2 ¼” x 2 ¼”

Product List

Sunday, February 28, 2016

St Patricks Day

Welcome to Sunday my crafty friends. It’s almost March. What do you think of when you think of March? I think of St. Patrick’s Day, shamrocks and everything green. With all that as my inspiration for today’s card, I needed a layout. Create with Connie and Mary came to the rescue with an excellent clean sketch.

Here is the layout from Create with Connie and Mary (#CCMC395). 


I got to sneak peek a video that my fellow Stampin' Up! Demonstrator friend, Raquelle shared her quick tip on making punch art shamrocks. I just had to try it myself. Pretty much take your Pansy Punch and Paper Snips and follow the steps in my photo below. Easy peasy!


So after making a few shamrocks, I took some Cucumber Crush ink and sponged around the edges to give it some more dimension. The Basic Black 2” Circle was the perfect backdrop to have the shamrock pop and not get lost in the Cucumber Crush/Whisper White background. Adding a bit of gold with the sequins just finished the card. 


If you would like to make this card, I have listed the measurements and products below:

Measurements:

Cucumber Crush 5 ½” x 8 ½” scored at 4 ¼”
Whisper White 4” x 5 ¼”
Cherry on Top DSP 4 ½” x ¼”
Cucumber Crush 4 ¾” x 1”

Product List

Saturday, February 27, 2016

Yay You

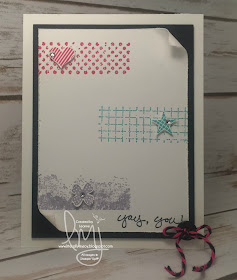
Welcome to Saturday my stamping friends. I made a quick card with some great texture stamps and punches.  

Color Combination: 


The card was fairly quick to put together. Using each of the individual colors above and a different texture stamp image from Timeless Textures stamp set. I also punched a heart, a star and a flower in the respective colors to adhere above the texture images. Adding a rhinestone to each of the punched pieces directs your eye to notice the shape. I had used my Paper Snips opened all the way and dragged the blade along the edges of the smalled Whisper White piece and then used the Bone Folder to curl opposite corners to add some dimension. The black button with baker's twine was used as the period under the exclaimation point. 


If you would like to make this card I have listed the measurements and products below:

Measurements:
Whisper White card base 4 ¼” x 11” scored 5 ½”
Basic Black 3 ¾” x 5”
Whisper White 3 ½” x 4 ¾”


Product List