Happy Sunday friends! It’s supposed to
be warm and sunny. So I thought a bright and cheerful card would be perfect for
today’s post.
What do you think about these colors together?
While at OnStage Live in Salt Lake
City (SLC) last week, I have either learned lots of new and/or refreshed up on some older techniques and tips. Well I
used one on this card today. I know it’s an “older” technique. Have you heard of Masking? But masking with
Washi Tape?Thank you Mary Knabe for sharing this in your demonstration and for now using up my supply of Washi Tape. (wink wink)
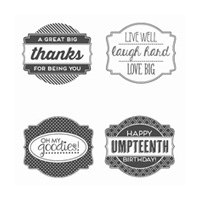
Here is the stamp set Oh My Goodies. Yes it's retiring and well I wanted to use up the one stamp that has not been used in this set before it leaves the catalog.
See that top left stamp? The one that says “A Great Big Thanks for
Being You”? Well I that’s the stamp I’m using but I didn’t want to stamp the
‘thanks’. Instead I chose to use another retiring product. I know but hey I'm
giving you many ideas on how to use the products once you have them in your
crafting space. The Greetings Thinlets. This was the perfect size for the area
I wasn’t going to be stamping. Win – Win! (Big Smile!)
What I began to do was find a smaller sized Washi Tape that I
could cut a piece or two to cover just the ‘thanks’ word. I want everything
else to stamp. The stipes, other sentiment, the lines framing the words. I just
didn’t want the t-h-a-n-k-s. The host 2015 – 2017 In Color Washi Tape from the
2016 Occasions Catalog was the perfect size! I’m not sure why I used the
Cucumber Crush one but I did. Probably because that was one of the colors I
chose to use on this card. Ha. (I know weirdo – you’re just going to throw it
away.) So I begin by placing the Washi Tape pieces on
the t-h-a-n-k-s making sure all the areas for that word are covered. See the
picture below.
Now carefully remove the inked (yup be careful
of your project no inky prints unless that is the look you're going for) washi
tape. I used tweezers (you could also use your paper snips or any other tool).
Now once that is done. Open the ink pad you plan
to use. Again mine is going to be the Cucumber Crush. Ink it up to make sure
your stamp is covered in ink. No need to put all your weight into the stamp and
ink pad. Remember kiss kiss lightly tapping until all raised rubber surfaces
are covered.
Once removed it should look all green except for
the 'thanks'. Now you are ready to stamp onto your card stock. You ready to see
the completed version?
I used
the layout from Freshly Made Sketches (#FMS233). Thank you Amy for a wonderful design.
Measurements:
- Cucumber Crush card base 4 ¼” x 11” scored at 5 ½”
- Whisper White 4” x 5 ¼” embossed with Modern Mosaic embossing folder
- Cherry on Top DSP 4” x 1”
- Calypso Coral ½” Seam Binding ribbon 5”


This color combo is so pretty and cheerful! I love it! And I love how you used the masking technique with this stamp. Pretty card! Thanks for joining us at Freshly Made Sketches this week!
ReplyDeleteThank you Amy!
Delete